Introduction
At this point, if you decide to go with free options for authentication and authorization within dotnet stack, you will end up with three options:
- OpenIdDict project derived from previously known IdentityServer, provides you libraries, with OIDF standard support, to build clients and servers. However, if you choose to build a server on your own, you’ll have to invest quite some time, as well as additional code for each new option that you need to support (think 2FA, OTP, reset password, delete accounts etc). If you need that flexibility then this might be choice for you. Also, there are some third party turnkey solutions like OrchardCore which perhaps accompanies more features then you actually need (disclaimer: I’m a bit frazzled about CMS and framework stuff so I’m unclear where the auth server resides).
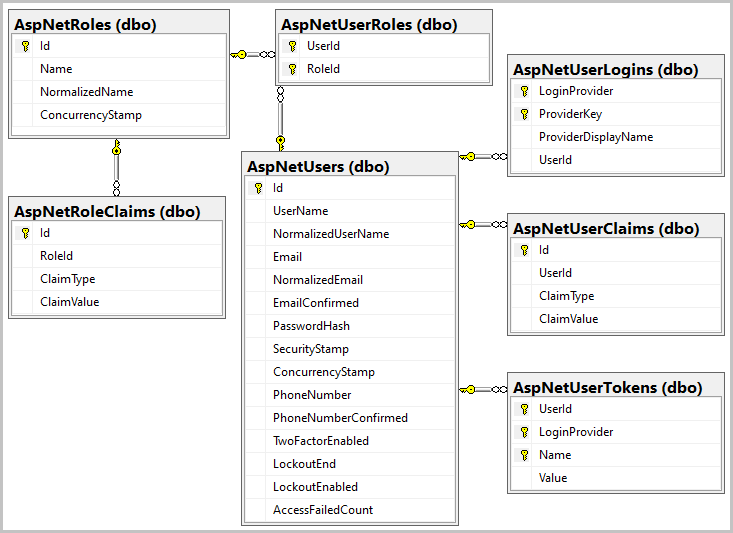
- ASP.NET Core Identity is old-fashioned way to go with EntityFramework, which in the end will produce us a database model like this:
Now if this hasn’t turned you off yet, expect that similarly as with OpenIdDict, you will need to maintain and build your own identity server.
- Keycloak provides out-of-the-box solution for authentication and authorization as well as advance options for integrations, social logins and user federation. It is proven in production and used often and it’s also part of CNCF.
Keycloak setup
For our demonstration case, we’ll build a web app that communicates with a backend API and uses Authorization Code Flow for user authentication. The flow involves following interactions between frontend app (React), backend API (AspNet WebAPI) and Keycloak (identity server).
Docker
To run the Keycloak server with Docker, we’ll need a database as well, so the choice we made in the following example for docker-compose specification is PostgreSQL:
services:
  database:
    image: postgres
    environment:
      POSTGRES_DB: keycloak
      POSTGRES_USER: postgres
      POSTGRES_PASSWORD: admin
    volumes:
      - postgres:/data/postgres
    ports:
      - "5432:5432"
    networks:
      - cleverheap-network
    restart: unless-stopped

  keycloak:
    image: quay.io/keycloak/keycloak:26.1.4
    command: start --import-realm
    environment:
      KC_HOSTNAME: localhost
      KC_HOSTNAME_PORT: 8888
      KC_HOSTNAME_STRICT_BACKCHANNEL: false
      KC_HTTP_ENABLED: true
      KC_HOSTNAME_STRICT_HTTPS: false
      KC_HEALTH_ENABLED: true
      KC_BOOTSTRAP_ADMIN_USERNAME: admin
      KC_BOOTSTRAP_ADMIN_PASSWORD: admin
      KC_DB: postgres
      KC_DB_URL: jdbc:postgresql://database/keycloak
      KC_DB_USERNAME: postgres
      KC_DB_PASSWORD: admin
    ports:
      - 8888:8080
    restart: always
    depends_on:
      - database
    networks:
      - cleverheap-network

networks:
  cleverheap-network:
    driver: bridge

volumes:
  postgres:
To run the server and the database user following command:
docker compose up -d
Once the containers have started, the Keycloak server dashboard will be available on http://localhost:8888. Use following credentials username: admin, password: admin when login form is prompt.
Create realm
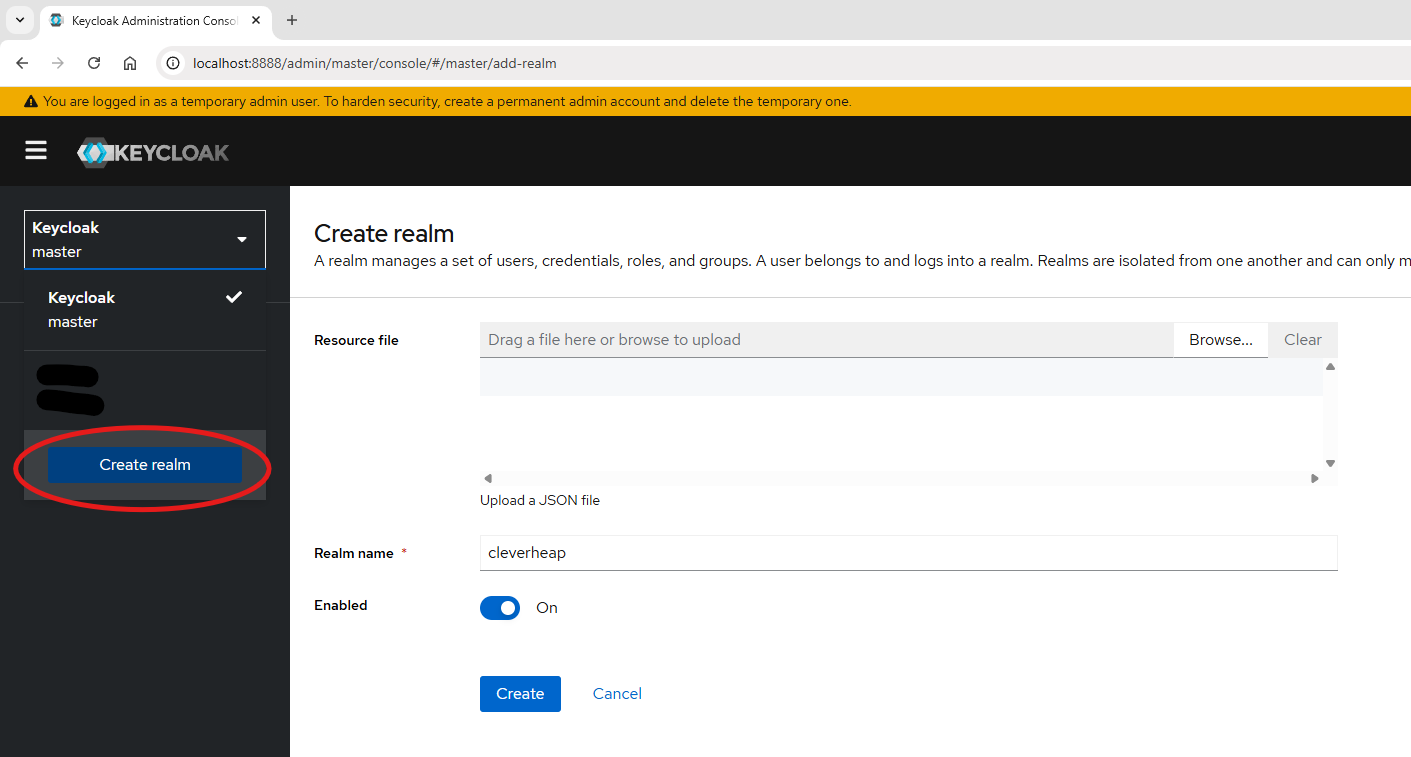
For each new project that we tend to work on, either a single application or an entire platform, we compartmentalize all user, clients and authentication/authorization management within a single Keycloak realm. For that purpose, we start by creating a new realm.
Once realm is created, we can now select it from realm drop down and proceed to Realm Settings. Under General tab we can setup a display name for our realm which will be used on authentication login form.

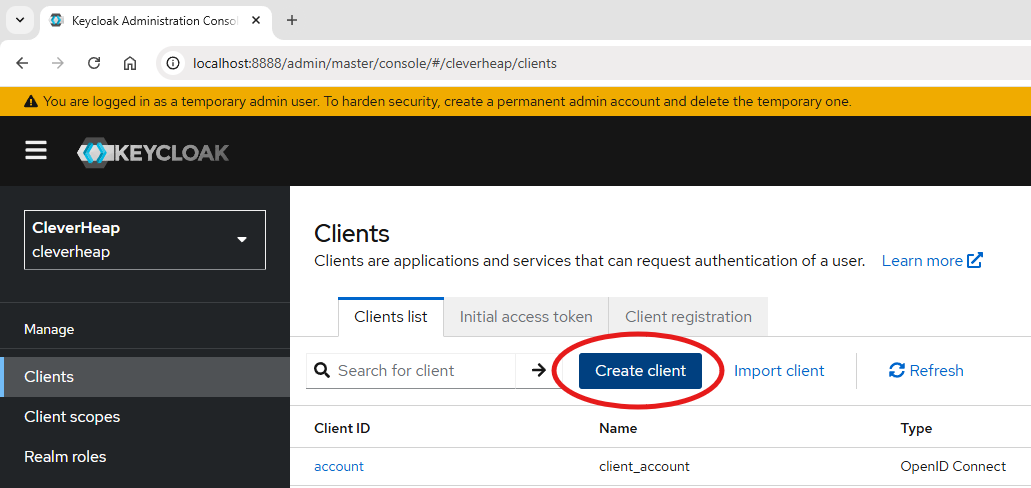
Create client
Once we completed the realm part, we can continue by adding a client app definition that we’ll use the Keycloak for the authentication. In the menu choose Clients option, and click on Create.
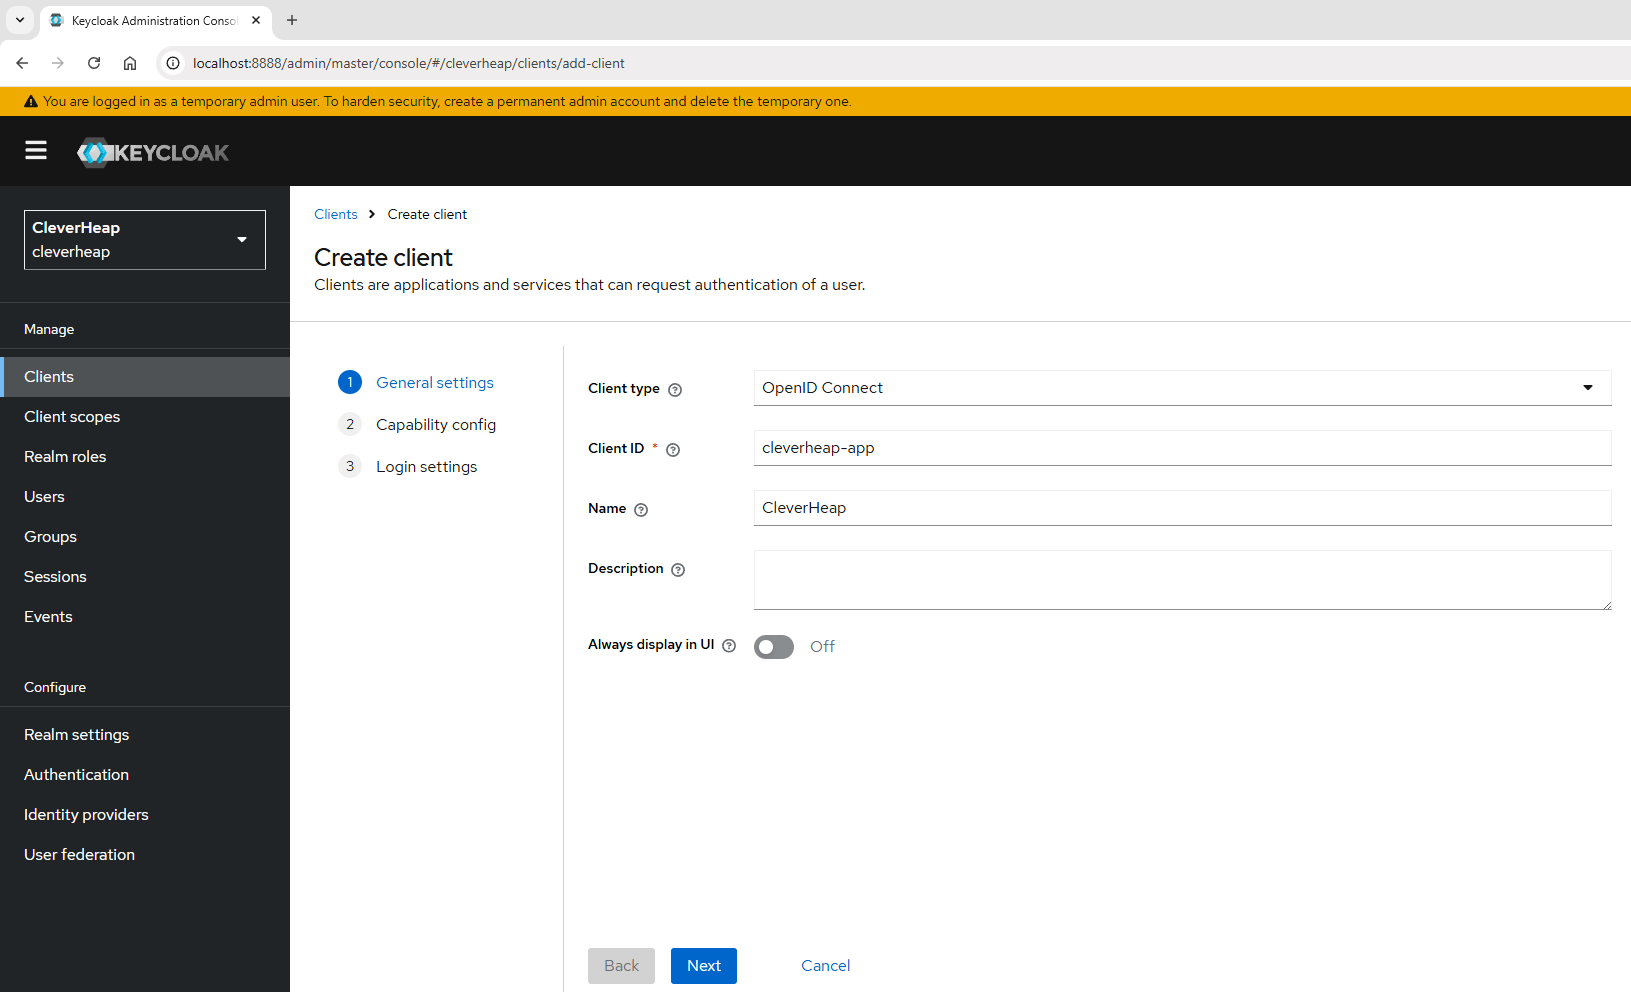
Under General settings, of create wizard, specify OpenID Connect as a client type and provide arbitrary names for client ID and client name.
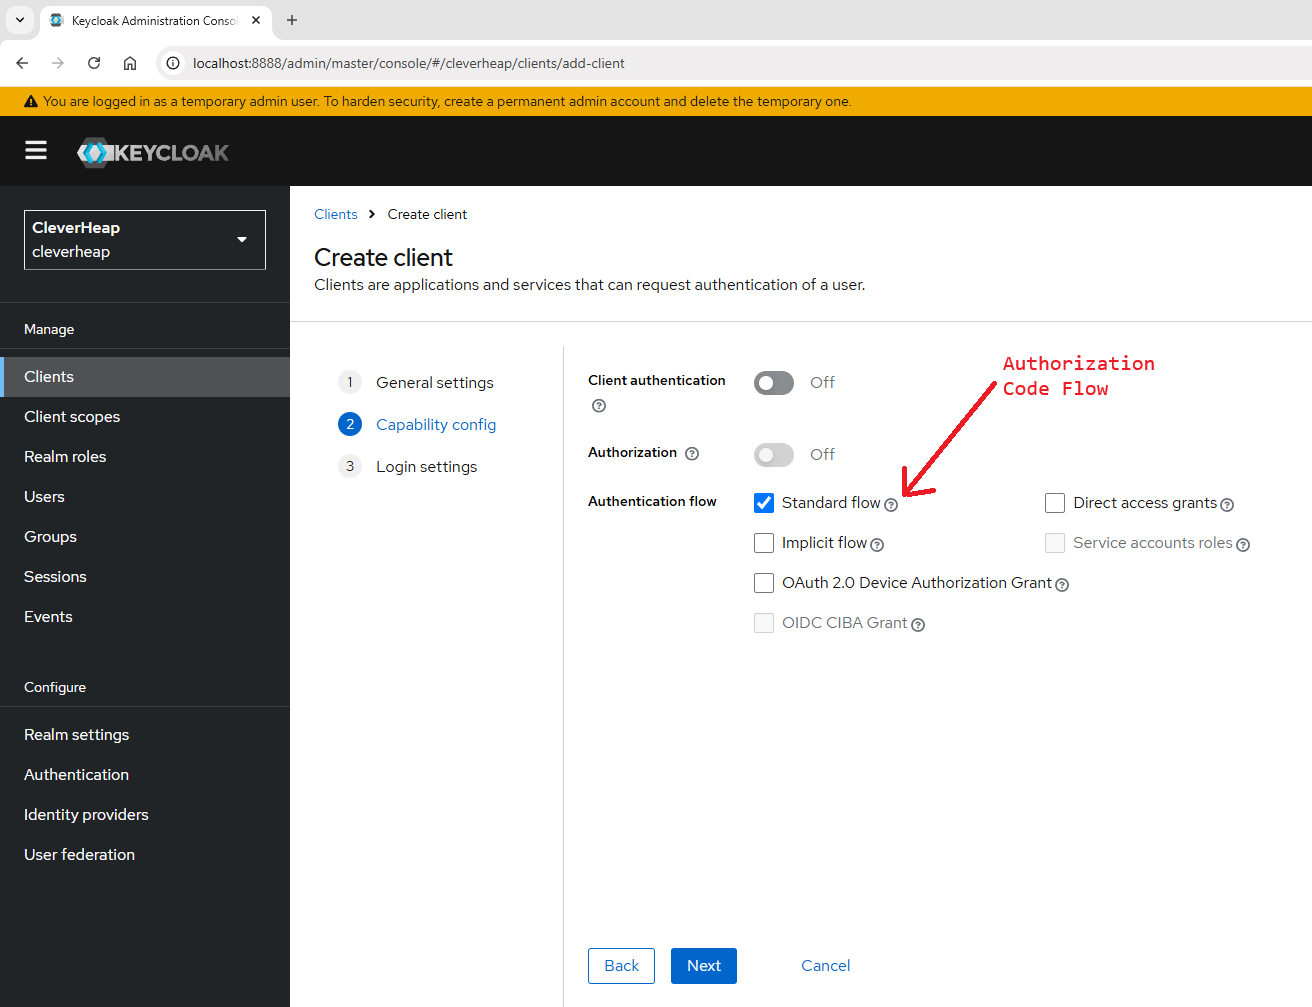
Under Capability config, we choose which authentication flow we are setting up for our application. In this case we choose Standard flow which relates to Authorization Code Flow. You can choose from several options of Open ID Connect flows. If you want to know more details about each flow, you can check the official documentation for Open ID Connect or Keycloak. For the simplicity, we have disabled the client authentication which can be enabled if you want Keycloak to verify your client app before further communication. This is usually done by using clientID and clientSecret as basic authentication that is then required and it precedes the protocol flow. Also, authorization can be enabled for cases where user permissions are also verified by the Keycloak.
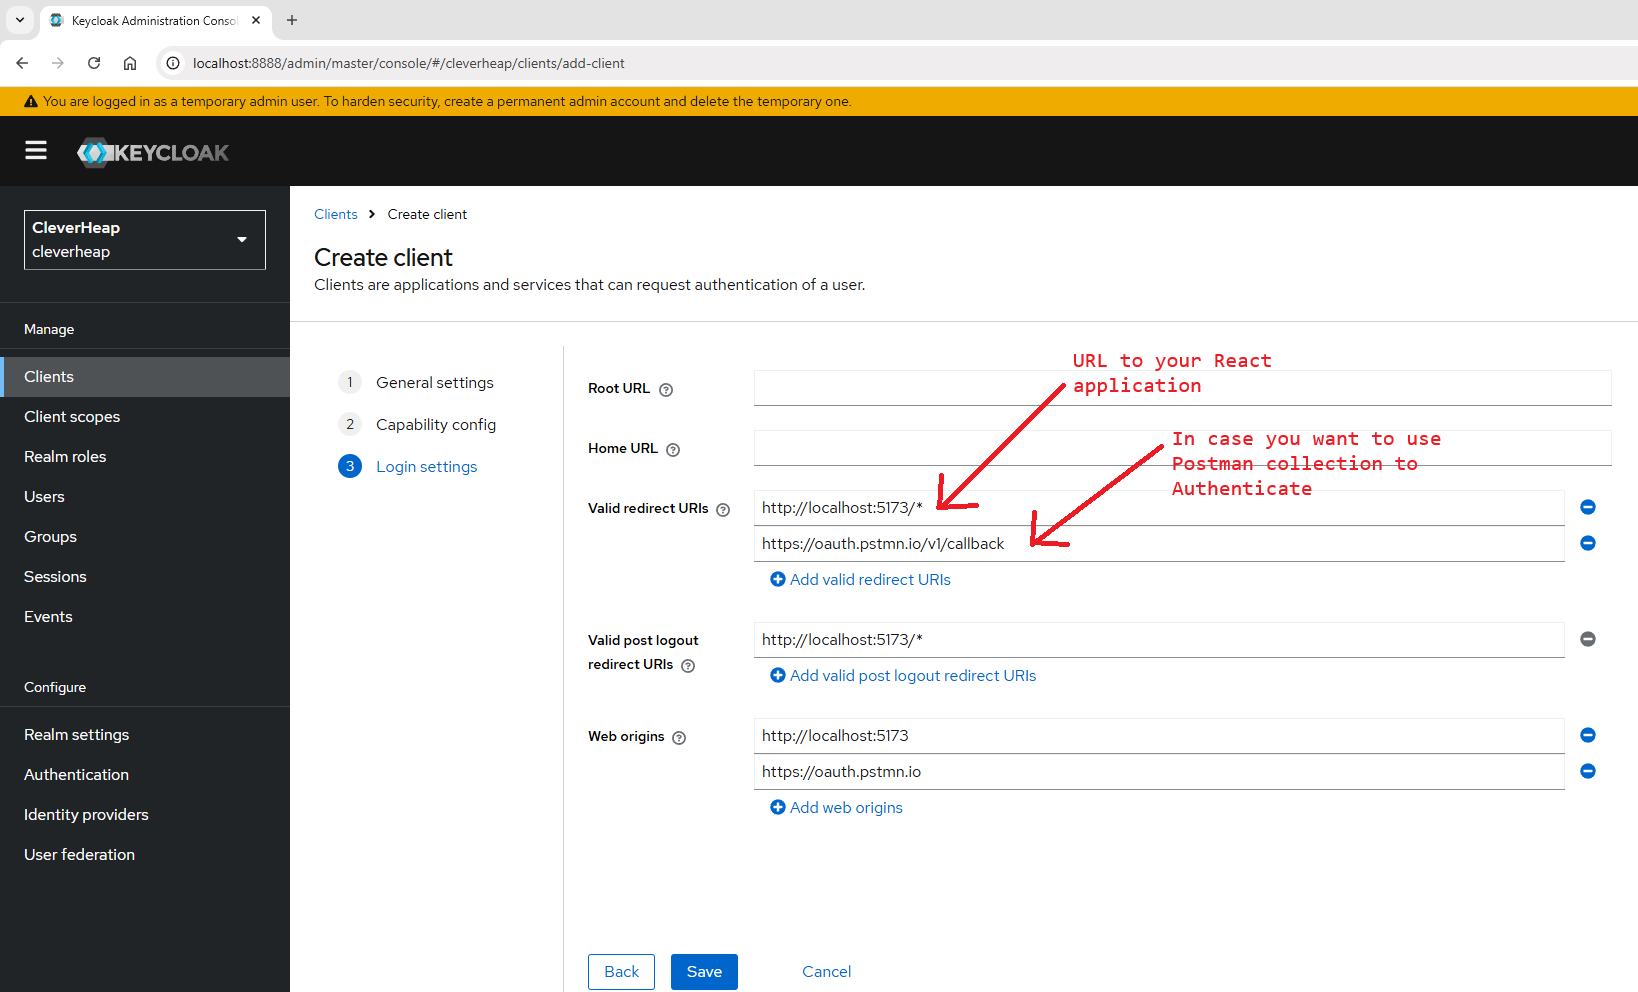
On our last step for the Client creation, we need to specify URLs that our client application will use. For the simplicity purposes, we also added Postman URLs for callbacks, but we could also use a separate realm’s client dedicated for this case. The ’*’ under callback URLs means any route following the root of URL we’ll be verified as valid one. For real world scenarios, it’d be preferable to specify dedicated routes for callbacks. The root of the URL should match the React or client app we are trying to develop.
Once you click Save you will proceed to Client details where you can double check your setup. Beyond General tab you will see Roles and Client scopes tabs, where you can set custom application roles or include additional scopes for your tokens that can carry user account details. You can also monitor your client sessions and user events under Session and Event tab as well as setup more Advance options for Open ID Connect protocol. Once ready, proceed with Save option presumably without any new modifications for our demo case.

Add user
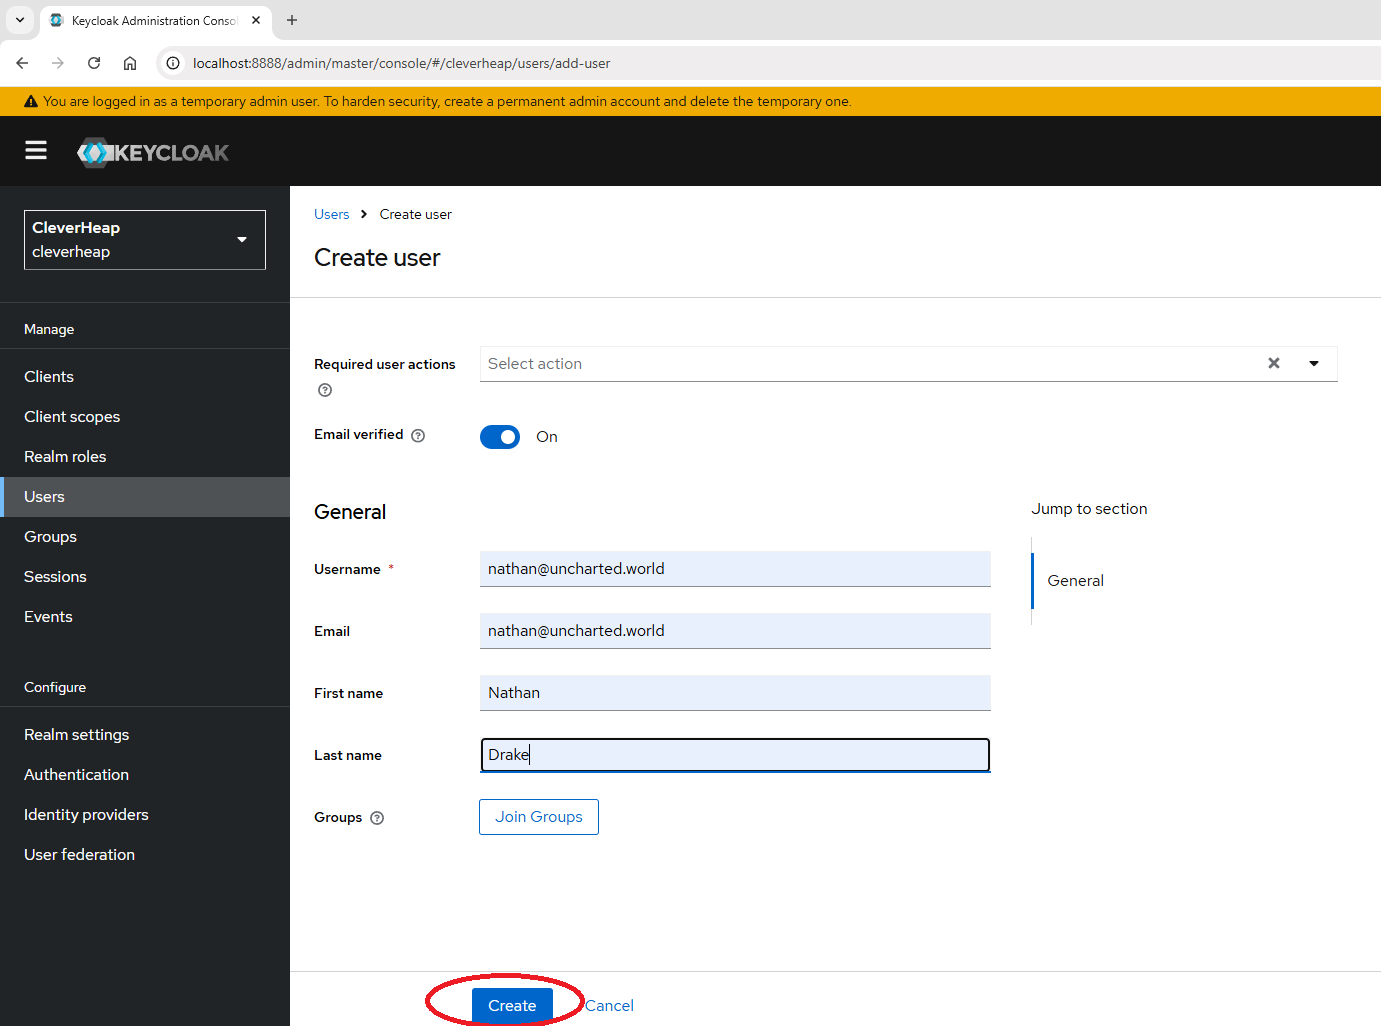
To simplify the demo for authentication, we’ll add a new user to Keycloak registry in order to skip user account registration process. This would also be a valid case in some more closed access applications that are not for a global public use.
In Create user form enable toggle indicating that email is already verified. Input arbitrary username and credentials for a user account. Once ready click Create.
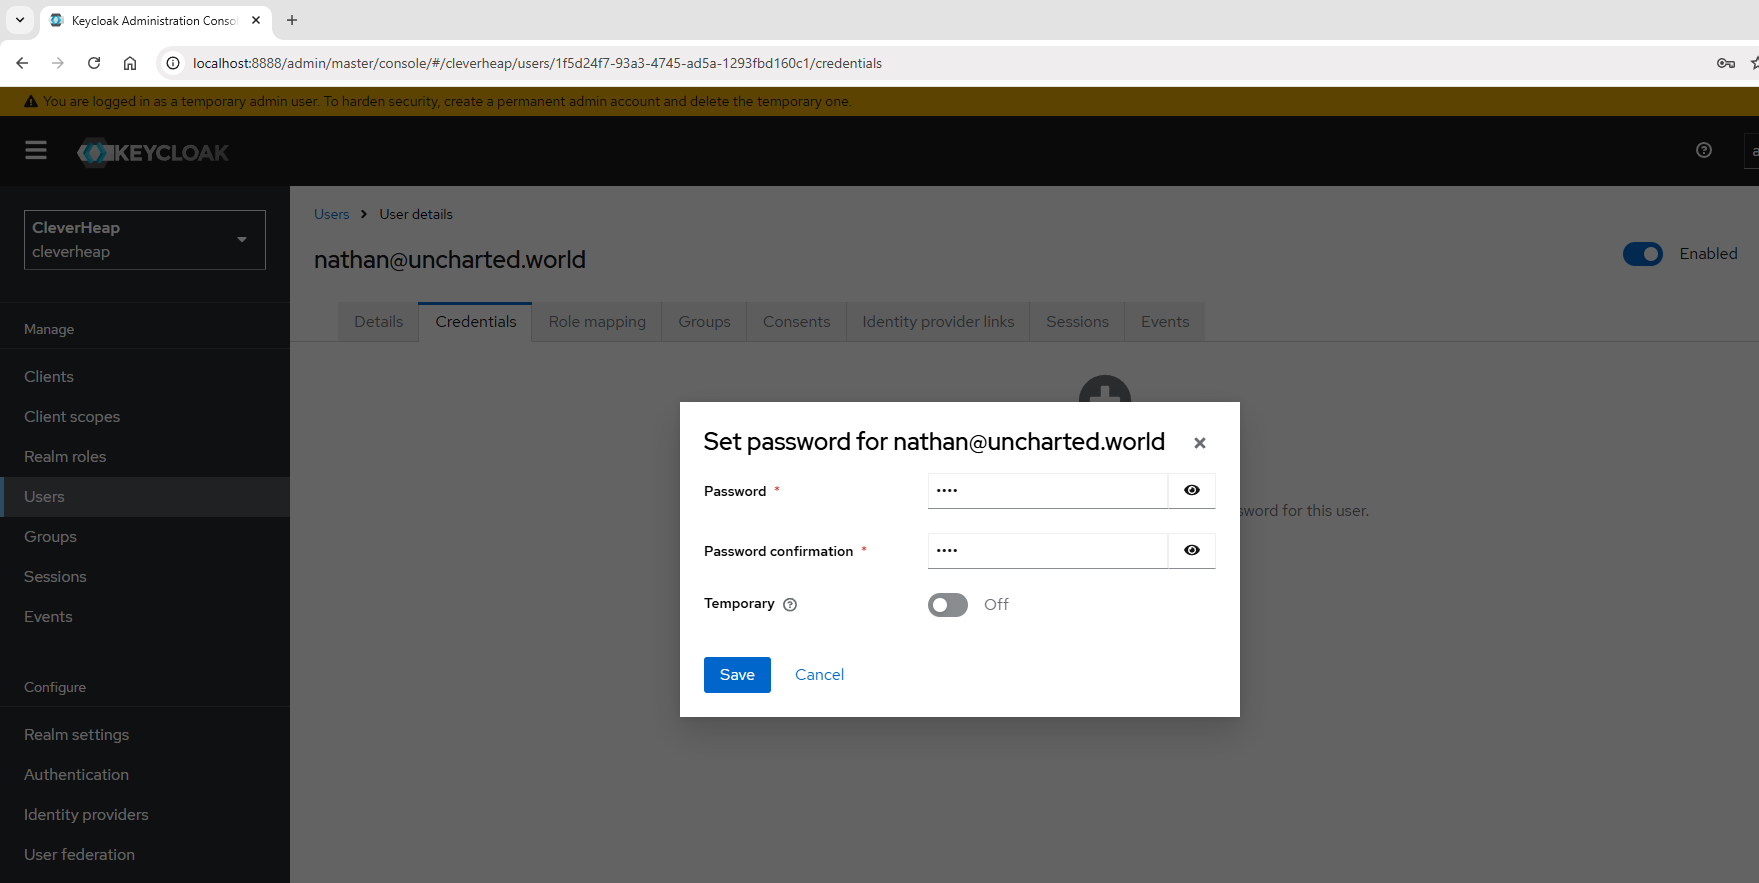
Once user is created a user detail page with Details tab will be opened. Under Credentials tab, click to add new credentials for the demo user account. Disable temporary password flag and enter a password phrase that will be used for log-in. Proceed and save the changes.
AspNet WebAPI setup
In this demo, we’ll show how to authorize incoming requests within a Rest API. We’ll implement API project using AspNet WebAPI framework.
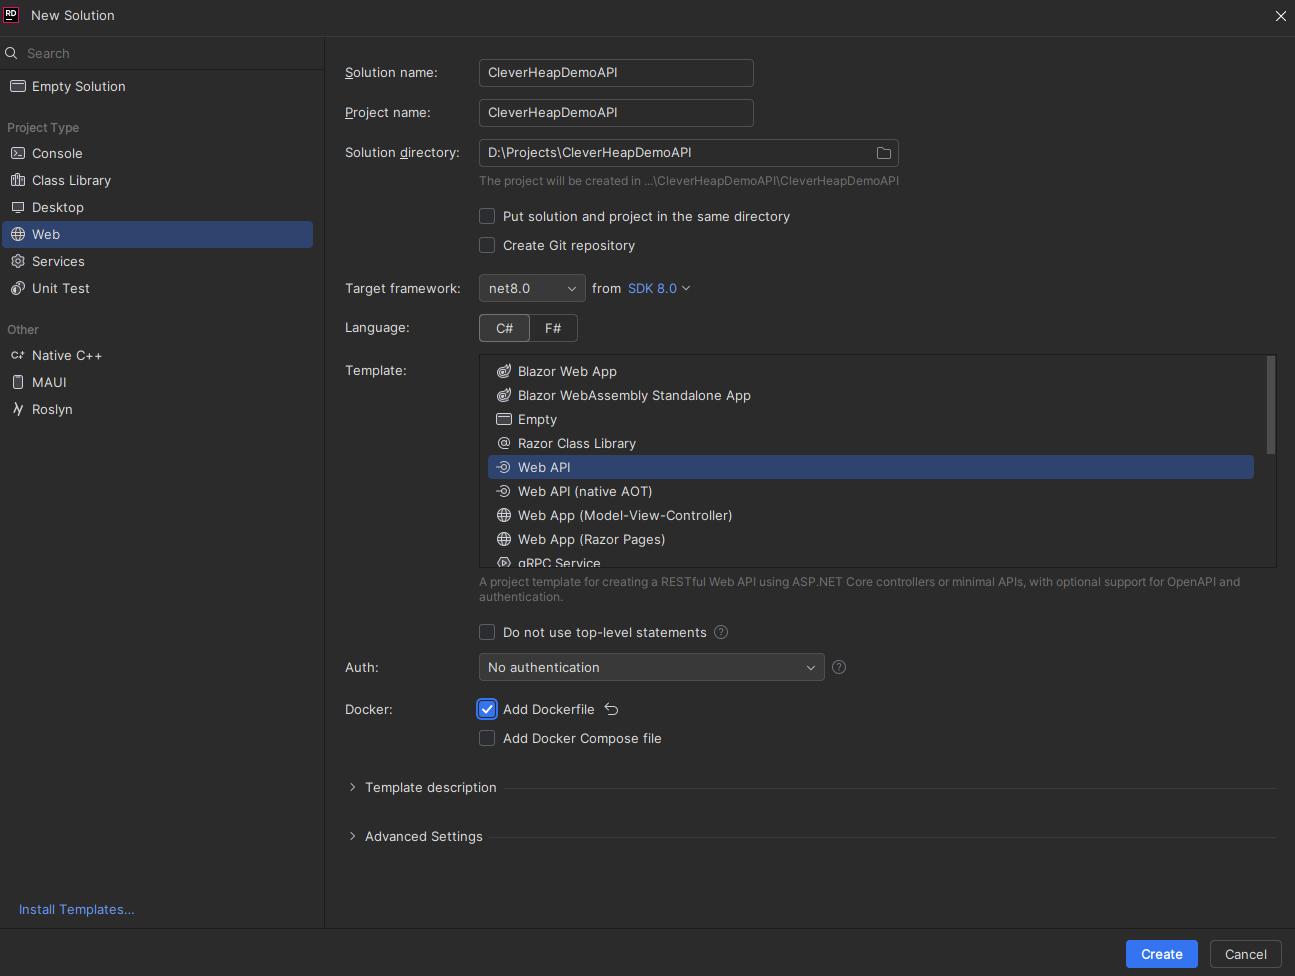
Create a New WebAPI solution with your favorite IDE in a similar way:
Create API Controller
In our solution, we’ll expand on our CleverHeapDemoAPI project and in Controllers folder we’ll add a new controller named HelloController. A simple GET action is added returning a string message.
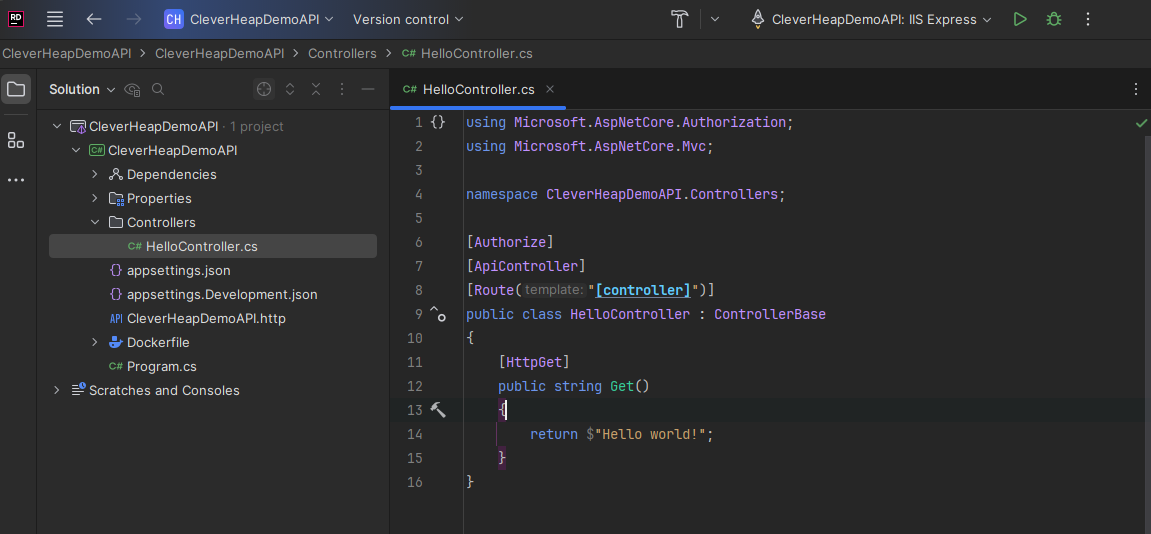
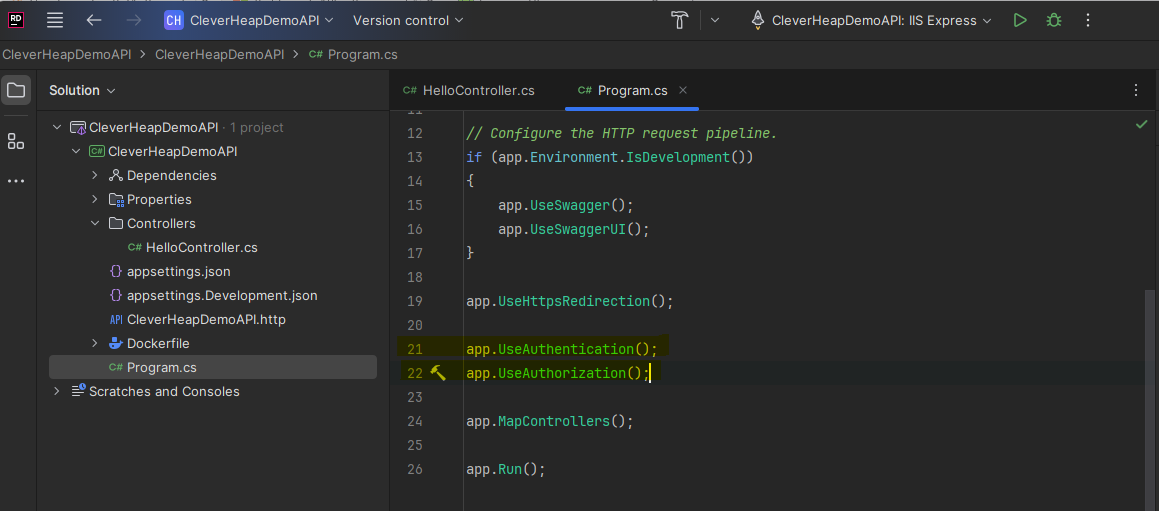
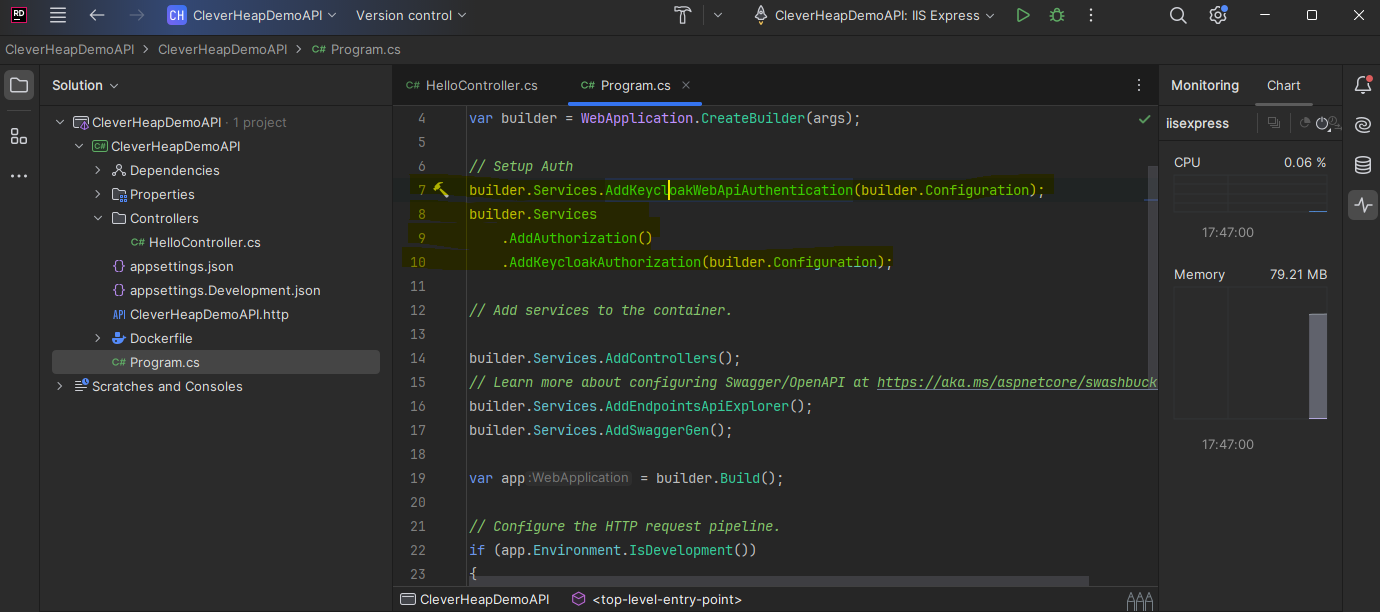
Note that the controller has [Authorize] attribute which indicates that any request for any action in this controller will be verified for authentication and authorization by proper middlewares. Those middleware needs to be enabled by introducing following code changes in Program:
Add Keycloak dependencies
To use Keycloak server for auth middleware verification, we need to add proper dependencies to our project that will alow us that:
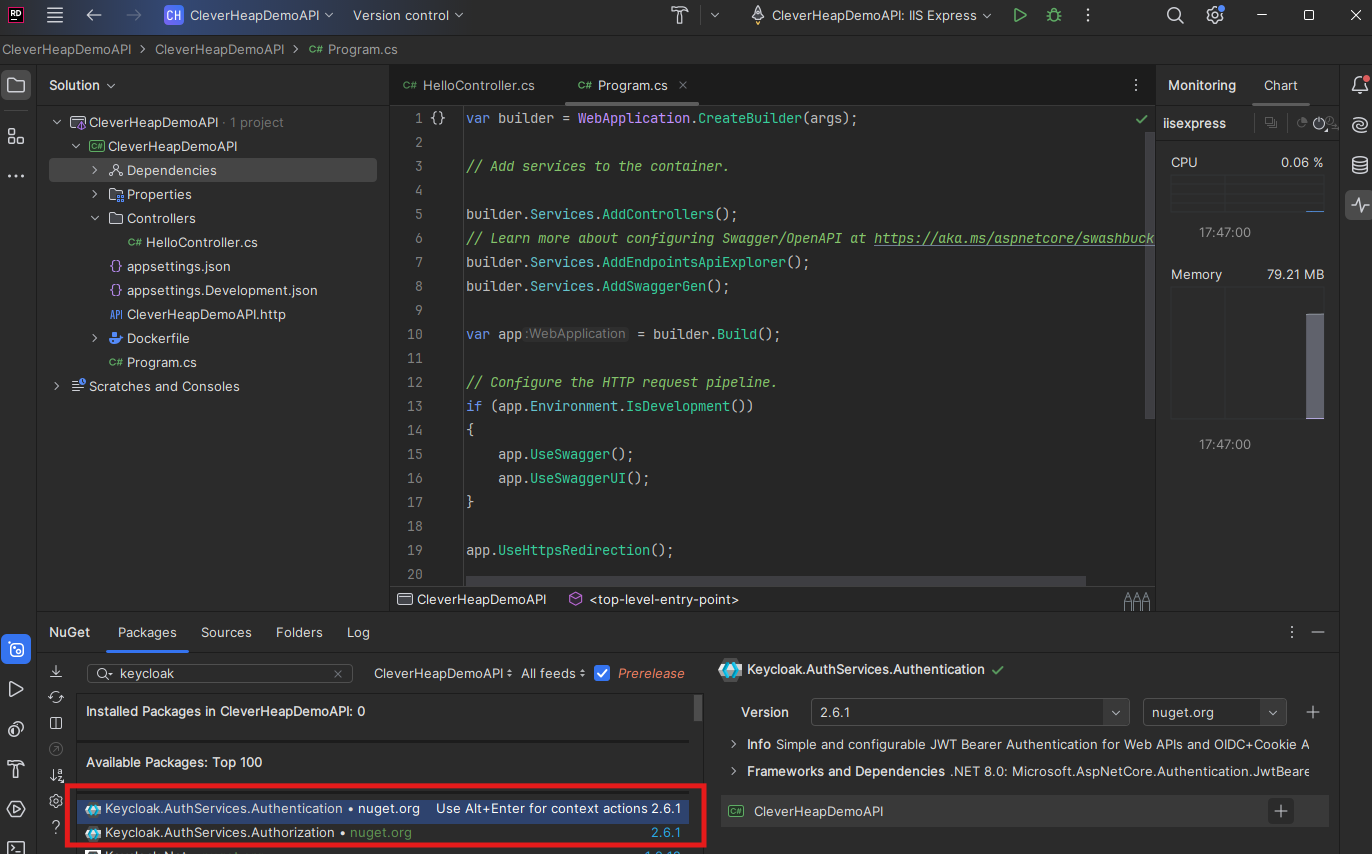
Once both are installed, we can edit Program.cs and register the middlewares in build part of the program setup.
Add Keycloak settings
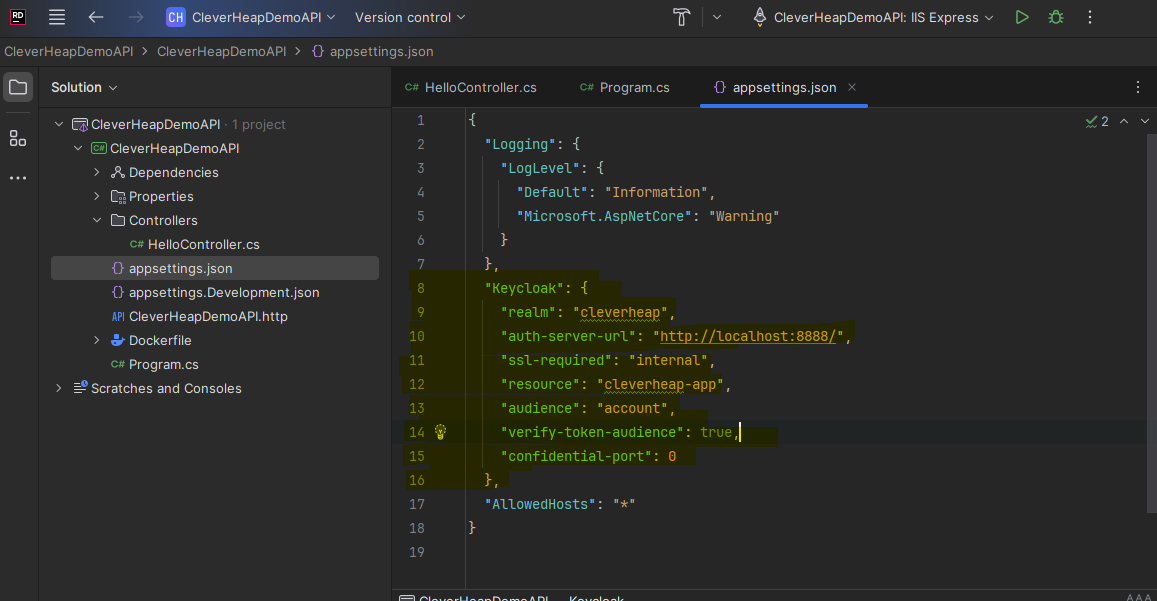
As the last step of the process, we need to add Keycloack settings. Open appsettings.json and add following Keycloack section to existing settings.
Test with Postman
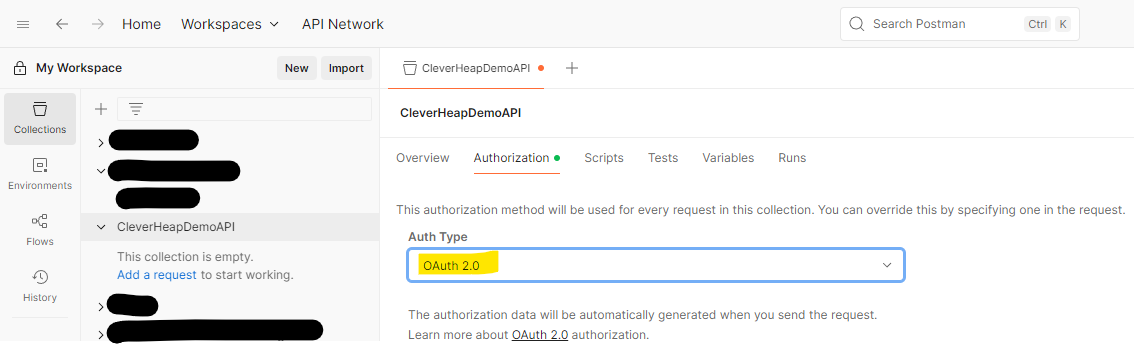
If you are already familiar with Postman, you will know this tool is used to create API collection of HTTP method calls to your API server. Create a new collection within your Postman and name it CleverHeapDemoAPI. Go to collection Authorization tab and choose OAuth2 for auth type.
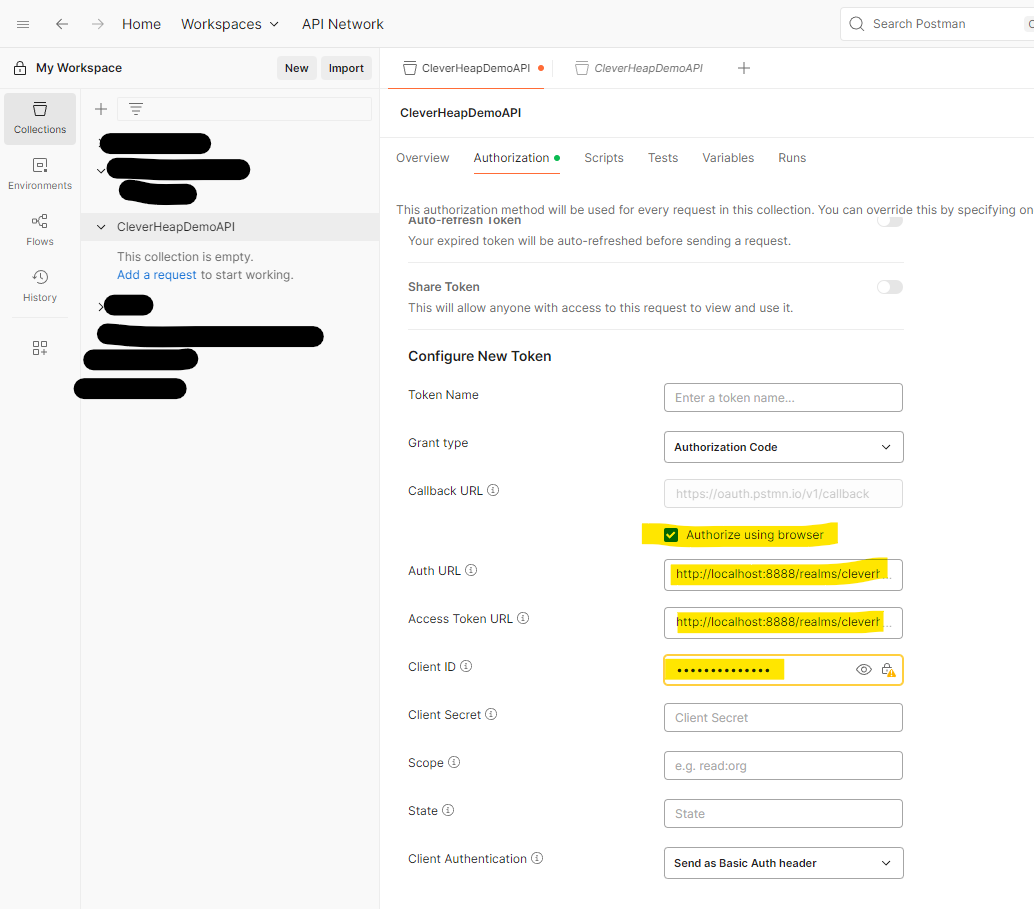
In client setup of Keycloak we have already set the proper callback URLs for Postman, so in collection Authorization section it’s sufficient to enable checkbox for ‘Authorize using browser’. Additionally, we need to add Auth URL and Access Token URL for our Keycloak server. Note that those Keycloak endpoints have to include realm name. Our Keycloak client ID is set for Client ID field. Once you set, invoke the authentication by clicking Get New Access Token button. This will pop up a browser and you can authenticate with user credentials we set for our demo user. Once successful the access token will appear so you can proceed by clicking ‘Use Token’.
When the token is received, we can test the server invocation by adding a new HTTP call. Start the WebAPI by running dotnet run or from your IDE. Then add a GET request to Postman collection and try invoking it by specifying Auth Type as Inherit Auth from parent (which translates that it will use the previous collection auth config). Once invoked, the response should be 200 with string message displayed.
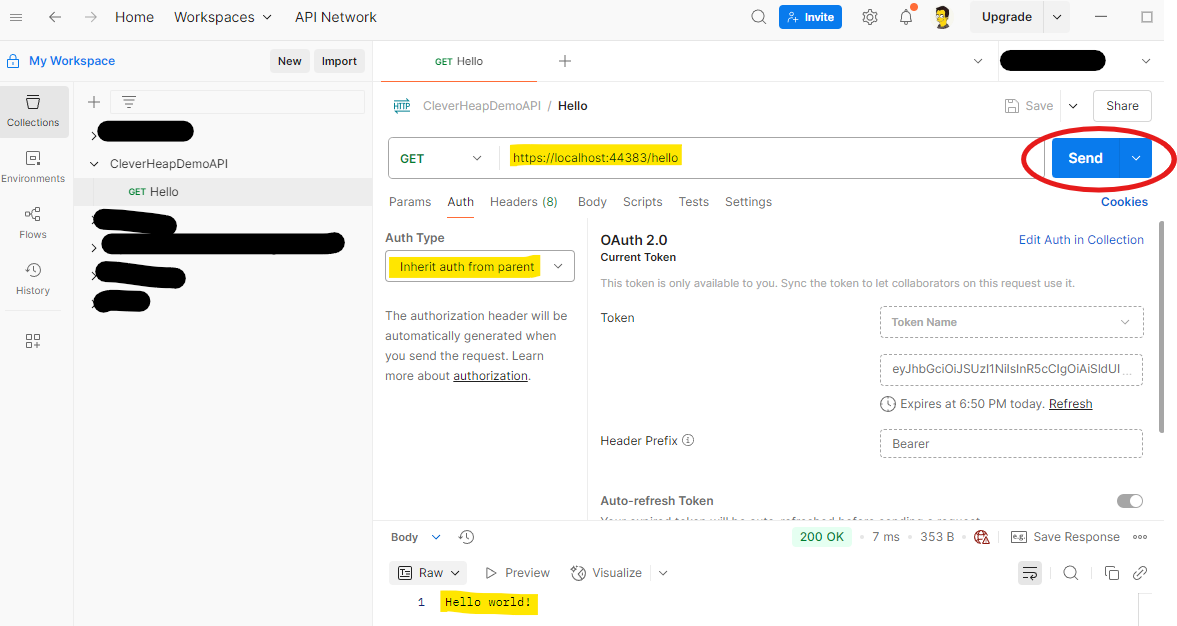
In case you try to invoke with ‘No Auth’ for Auth Type, you’ll receive 401 Unauthorized error.
React setup
For the application part we’ll setup a React project that allow users to login via Keycloak sign-in page. If you already running your Keycloak server in Docker, the remaining prerequisite for setting up project is that you have NodeJS version installed. Once ready, you can setup your React project with the following command:
npm create vite@latest cleverheap-app -- --template react-ts
Once set, run the following sequence of commands that should load up your scaffolded version of the app.
npm install
npm run dev
Now we need to install the required package that will allow us to set up Open ID Connect protocol with our Keycloak server:
npm install react-oidc-context
Once the package is installed edit the following code of the main.tsx file:
import { createRoot } from "react-dom/client";
import "./index.css";
import App from "./App.tsx";
import React from "react";
import { AuthProvider } from "react-oidc-context";

const oidcConfig = {
  authority: "http://localhost:8888/realms/cleverheap",
  client_id: "cleverheap-app",
  redirect_uri: window.location.origin,
  response_type: "code",
  automaticSilentRenew: true,
  loadUserInfo: true,
};

createRoot(document.getElementById("root")!).render(
  <React.StrictMode>
    <AuthProvider {...oidcConfig}>
      <App />
    </AuthProvider>
  </React.StrictMode>
);
Using AuthProvider wrapper and Open ID Connect configuration (filled out with our Keycloak server information), we conform to the need that the same instance of the provider will be globally accessible through the entire application.
Edit your App.tsx file accordingly:
import { useAuth } from "react-oidc-context";
const App = () => {
const auth = useAuth();
if (auth.isLoading) return <div>Loading...</div>;
if (auth.error) return <div>Error: {auth.error.message}</div>;
return (
<div>
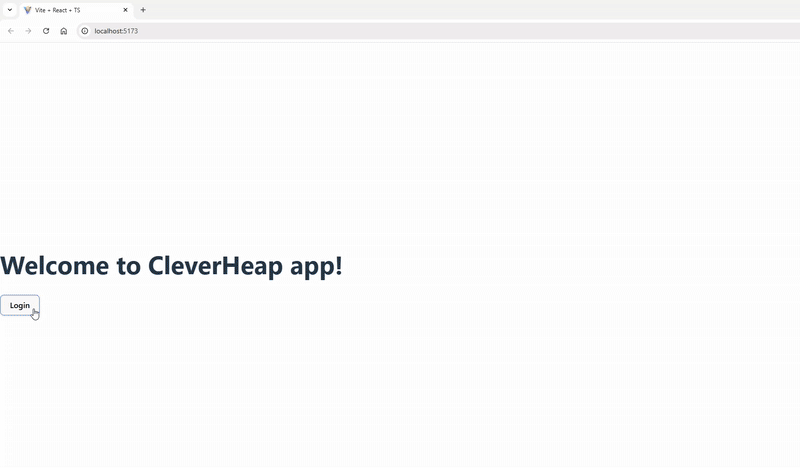
<h1>Welcome to CleverHeap app!</h1>
{auth.isAuthenticated ? (
<>
<p>User: {auth.user?.profile.name}</p>
<button onClick={() => auth.signoutRedirect()}>Logout</button>
</>
) : (
<button onClick={() => auth.signinRedirect()}>Login</button>
)}
</div>
);
};
export default App;
Once the user accesses the app and clicks login, the redirection will occur and the Keycloak server sign-in page will show. If the login is successful the user account details will be available and the user’s display name will be presented as well as the log out option. If you start your application again by running npm run dev and browse the local URL, you should be able to navigate the sign in flow.
Conclusion
In this post our goal was to demonstrate a basic usage and integration with Keycloak identity server. Therefore, we built a backend Rest API solution to authorize incoming requests and a client application to implement login flow. Hopefully, this tutorial will give you some guidance on how to bootstrap your own solution with Keycloak.